Showing posts with label Decorating. Show all posts

Thursday, October 22, 2015

Adding an accent wall

Living room accent wall using HGTV Home Sherwin Williams Spiced Cider

All the walls in my house are a taupe color, and I left them that way when I moved in because I figured I could use furniture and accessories to add color.  I love color but I also love to change up things every now and then, so I didn't want to be locked into a color choice that I might regret later.

However, the more I looked at the wall where my couch is located, the more I thought it begged to be an accent wall.  I have a lot of greens and blues in my house, but I decided using one of those colors as an accent would be too much.  Eventually, I chose Spiced Cider - SW7702 - from the Sherwin Williams HGTV Home collection.  

This is the couch and wall before I painted.  You can see how the couch almost blends into the wall.


Adding the accent wall really makes the couch, pillows and accessories pop.  I couldn't be happier with how it turned out.

Living room accent wall painted with HGTV Home Sherwin Williams spiced cider


Read more ...

Sunday, June 16, 2013

DIY Embroidery Hoop Wall Art for Nursery


I love the embroidery hoop wall art that I see on Pinterest and everywhere else these days and fortunately, my niece does too.  So, I decided to make some for the baby's nursery.  I wanted to use different fabrics so I found someone on Etsy who was destashing some fabric remnants in exactly the colors I needed, primarily red and blue.
Image
I also found someone on Etsy selling a lot of embroidery hoops in different sizes and shapes.  Purchasing these was more economical than buying the hoops separately.Image
I placed a piece of fabric in the hoop and pulled it as tight as possible before turning the screw at the top to close it even tighter.  The outside piece of the hoop would rise a little as I was tightening the screw but I would just push it down and that helped the fabric go even more taut.
Image
Then, I trimmed the fabric around the edge of the hoop, leaving about three quarters of an inch of the fabric all the way around.
Image
The fabric would be glued to the inside back of the hoop.  But to give the embroidery hoops a finished and professional look, I needed to buy some felt and insert that into the back also.  My first step in that process was to draw an outline of the embroidery hoop on the felt and cut it out.
Image
Image
I then glued the fabric hanging over the side onto the inner rim of the embroidery hoop on the back.  You could use a glue gun to do this, but I don't like glue guns so I used Aleene's Fabric Fusion.
Image
Using my fingers, I pushed the fabric down in place on the glue.  This got a little messy because I ended up with glue on my hands.
Image
Then I put the piece of felt into the back of the hoop and pushed the edges over the top of the fabric that I had just glued into place.  If the fabric was thin, the glue I had used for the fabric was usually enough to hold the felt in place.  But if the fabric was thicker, I had to add some additional glue to hold the felt in place.  Just be careful not to overuse the glue.  It will bleed through to the fabric on the front of the piece.
Image
I used different fabrics on each piece and loved how they looked together.
Image
But I wanted to personalize them even more.  If you remember from my previous post, I am using a teddy bear theme in the nursery and am also throwing some baseball into the mix for the father.  I know you probably can't tell, but the light blue fabric in one of the hoops has teddy bears.  So, I bought some teddy bear and baseball appliques and added them to the hoops.  Even though the appliques were iron-on, I glued them on.  I also added an applique for the letter of the baby's first name.

These will go above the crib and can be left close together or spread out more on the wall.


Read more ...

Saturday, June 8, 2013

Soda crate table


I know it's been awhile since I last posted but it seems I never have enough time for everything I need and want to do.  Now, I'm occupied with decorating a nursery.  Before my niece was even engaged to be married, I had started collecting items for both a girl's and a boy's nursery, because she told me that I could decorate her baby's nursery.  So, I was really excited to hear that she and her husband were expecting their first baby in November.  Once they knew the baby would be a boy, I started all my nursery projects.
When I first began collecting items for a boy, I decided to go with a teddy bear theme.  The main reason for that was because I found the cutest baby quilt by an Etsy seller and knew I had to have it.  I have also added other bear items from Etsy sellers including a bear rug and a chenille bear.  These will be perfect in the nursery.
Image
Because my niece loves vintage, I am able to add some vintage to the nursery.  One of my projects is a table made with a soda crate.  I also plan to hang an old crate on the wall as a shelf.
For this project, I needed a crate - which I already had - and a table with a top which was roughly the same size as the crate.  I found a cheap one at a flea market.
Image
Image
As I'm using a lot of primary colors in the nursery - red, blue, yellow - I wanted to paint the table base in blue.  I decided not to paint the top of the table since it would be attached to the crate, so I taped off the top.
Image
I bought a blue spray paint and painted the table in my garage, which turned out to be a bit of a mess.  My garage was covered in blue dust when I finished.
Image
Image
After I had let the paint dry, it was time to attach the crate to the tabletop.  I decided to glue it on, because I didn't want to bother with a drill and screws.  I used Liquid Nails and put some on the bottom of the crate.
Image
Then I turned the table upside down and centered it on the crate.  It was much easier to do it this way than to try to center the crate on the table when it was right side up.
Image
I put some weights on it to hold it in place while the glue dried.  Once the glue was finished drying, I turned the table right side up.  Because the bottom of the crate on the inside was in rough shape, I bought a cheap plastic place mat and trimmed it down to fit the inside.
Image
Image
Read more ...

Monday, September 24, 2012

Repurposing

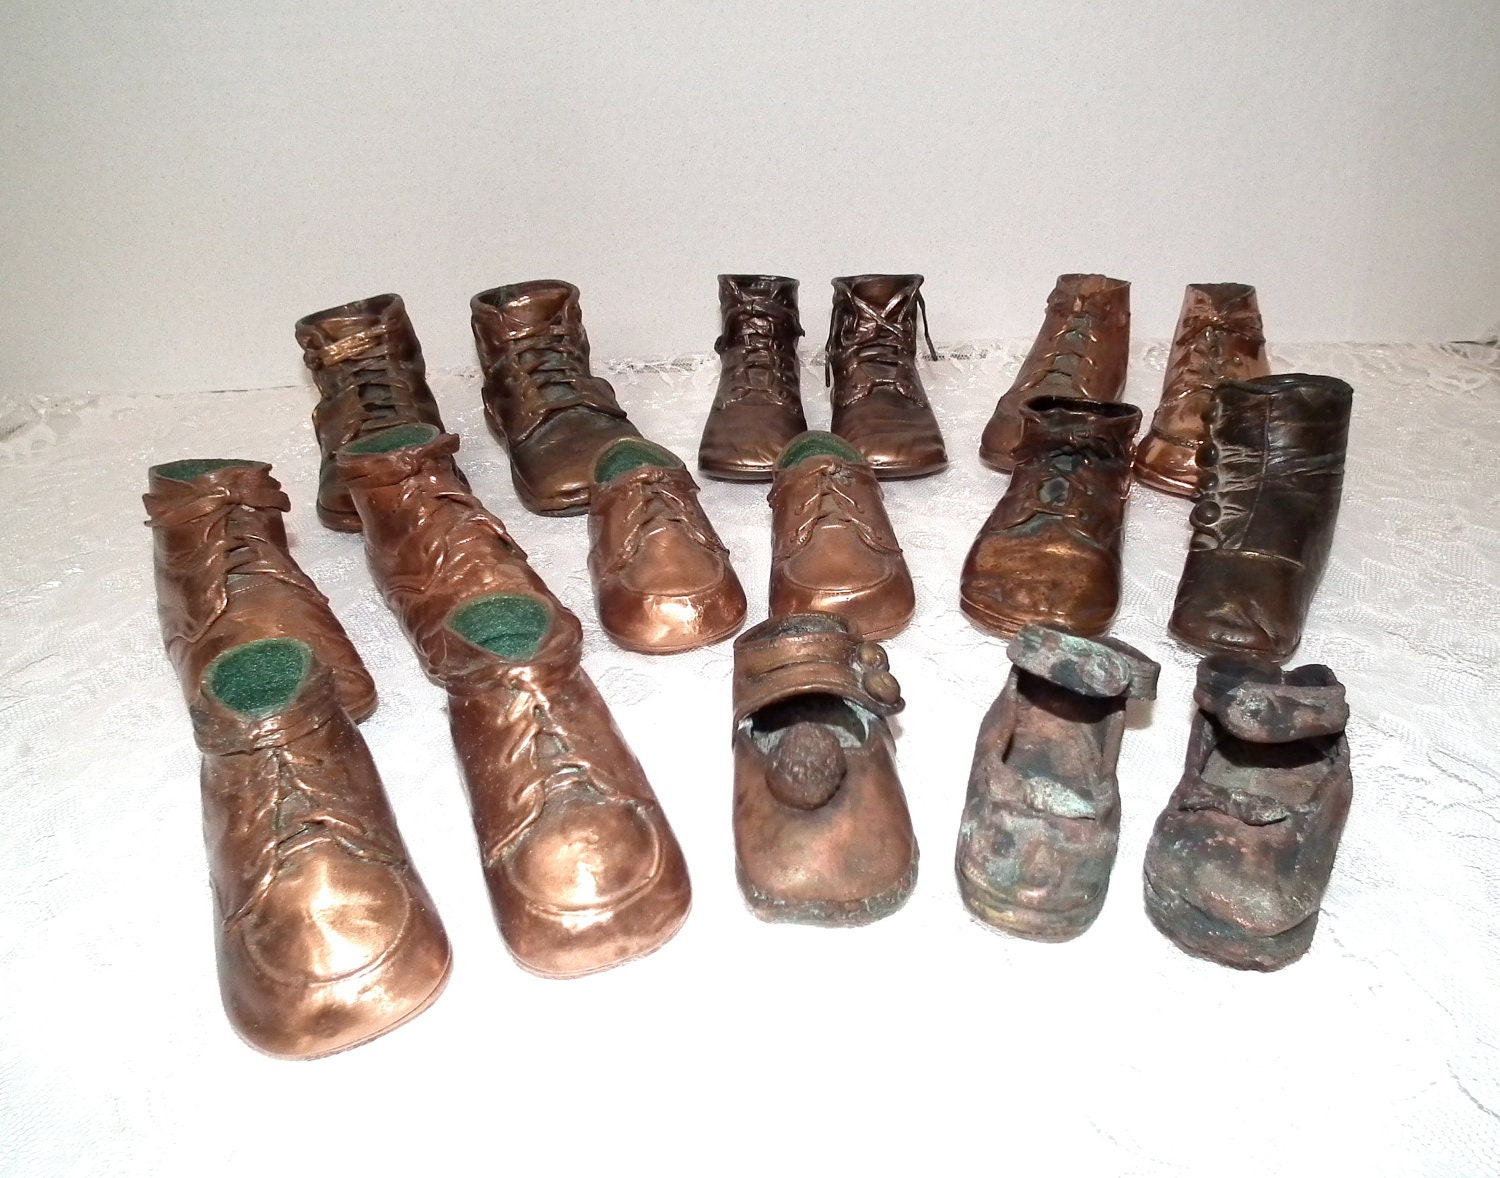
I love to repurpose vintage items. By that I mean to use them for a purpose for which they were not originally intended. A lot of times I buy vintage items without knowing what I want to do with them and sometimes I buy with an idea in mind and never get around to using them. Right now, I have a lot of those copper or bronzed baby shoes in my Etsy shop.


There are a total of seventeen shoes, seven pairs and three singles. Some of the shoes are very old - maybe even victorian. I originally bought these because I was going to use them as little planters on my deck and porch. I never got around to doing that because for one thing, I'm not sure it would be good for them to be out in the weather. So, that is why they're now in my shop.

I can see lots of other uses for them. I think they would be adorable as part of a baby mobile. Use some of the shoes and some wooden blocks spelling BABY or the baby's name - or add some vintage toys to the mobile such as rattles. I also think they would be adorable to make centerpieces for a baby shower. They could have flowers or rattles or candy or whatever else matches the theme and be given away as prizes for games. Of course, I still think about the planter idea for an indoor area.

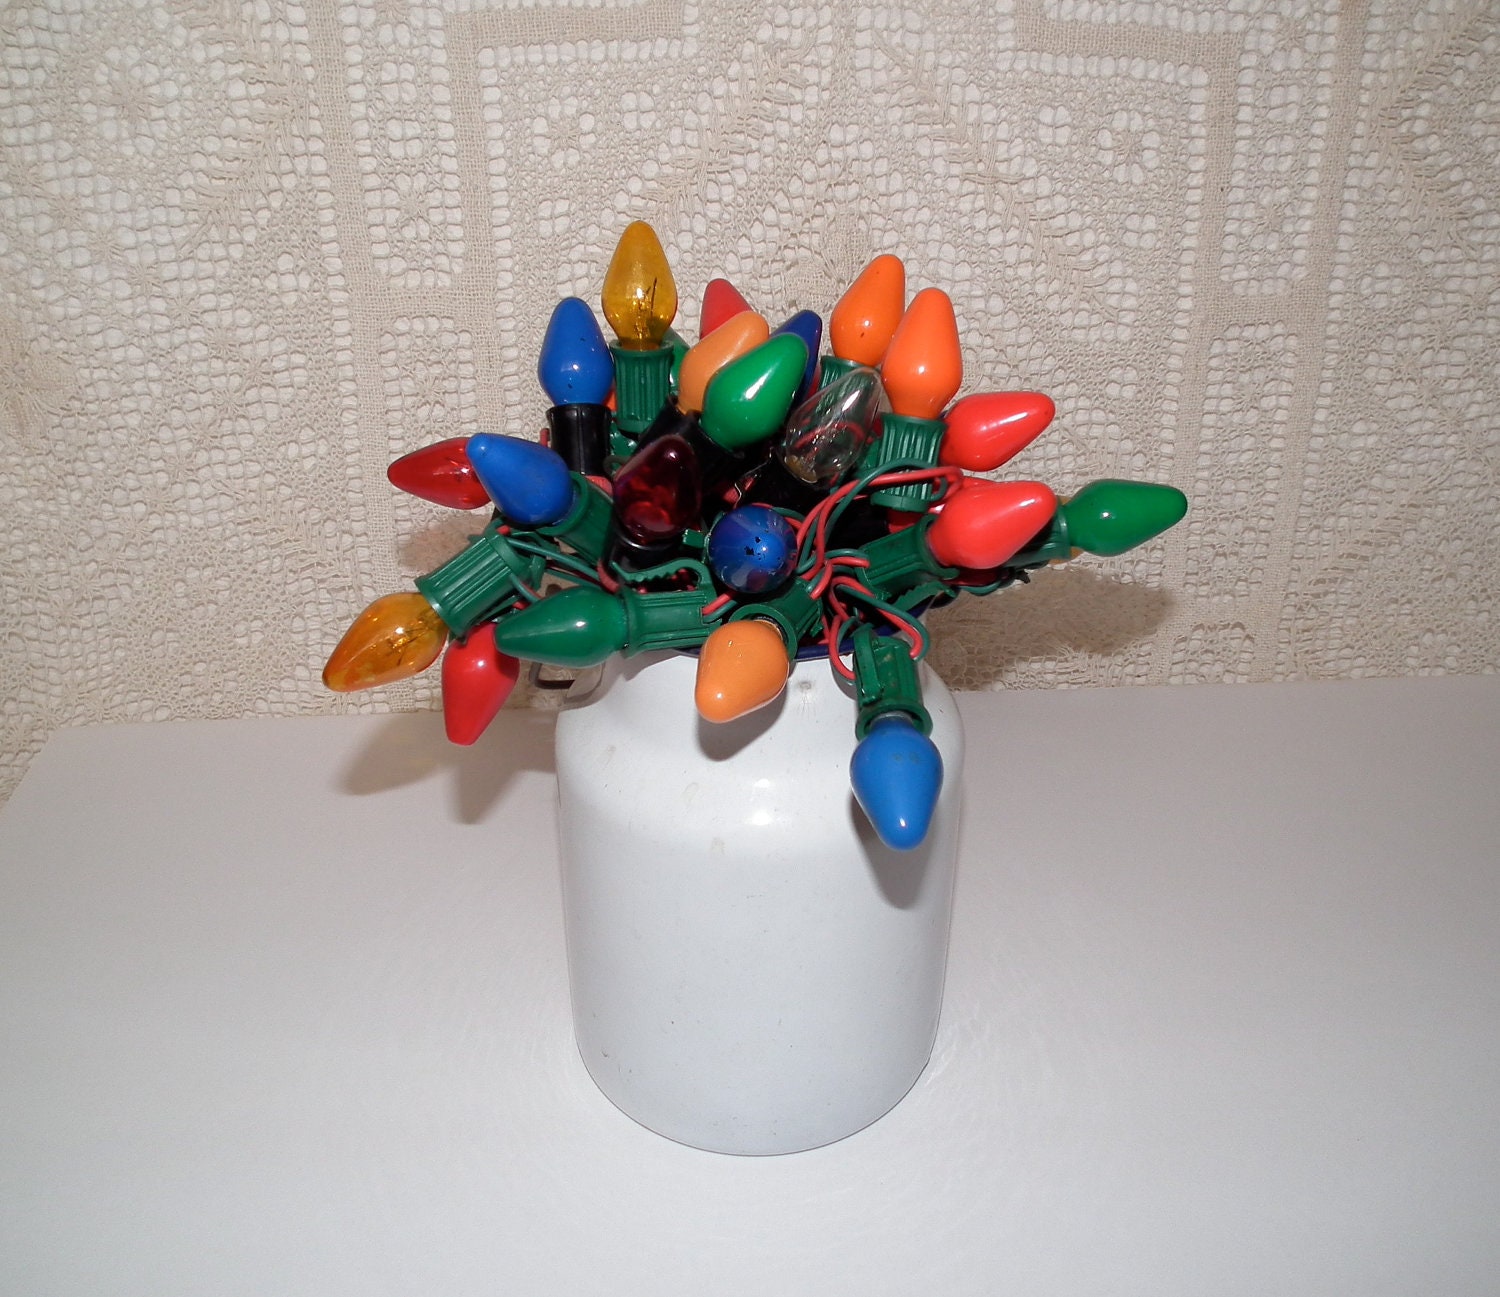
I've posted this before, but an idea I borrowed from someone at a flea market is to use a vintage string of Christmas lights as a bouquet in an enamelware container. It's a great way to repurpose those lights since I personally think they're a fire hazard and a way to display some of your vintage items at Christmas. I have added one of those "bouquets" to my Etsy store in case you're looking for one.

Read more ...

Saturday, July 7, 2012

Decorating a girl's bedroom

The wedding was lovely - my niece said it was perfect. But I'm glad it's over. It's been quite awhile since I wrote about anything else.

Today I want to talk about decorating a girl's bedroom. I don't have any girls for whom I can decorate - yet. My niece has promised me that I can decorate her children's nurseries, and I've actually started collecting items for both a girl and boy. But in the meantime, I am using an Etsy treasury to plan a girl's bedroom. Even an imaginary room is fun to plan.

I have a quilt in my store that I think would look wonderful in a little girl's room. It is twin-sized and primarily has green, pink and turquoise in it. I wanted to come up with some different ideas for a girl's room using the quilt, so I made a treasury that features different color combinations and/or themes on each line to use with the quilt. I think it would be so much fun to give a child a budget and let them find items on Etsy that they want to use in their own room. They could make a treasury as I have to see if the colors work together. When I was young, my color sense was terrible. My clothes never matched and my sisters still tell the story of my father sending me back to my room in the morning to change clothes for school to something that looked better together. If I had the chance as a child to make a treasury and put colors together to see how they look, my color sense might have developed earlier.

So, this is the quilt in my store:


'For a girl's bedroom' by TouchingThePast


Ballerina Figuirine Trinket ...
$6.50

16x20 Memory Board Bow Holde...
$68.00

lovely summer trends Pink Sw...
$32.00

Ballerina painting
$95.00

Set of Four 5x7 Modern Flora...
$39.95

Decorative Pillow Cover - 12...
$49.00

Dorm Decor - Mod Flower Drum...
$52.00

Jewelry Organizer Vintage Sp...
$27.99

BED Canopy Crown Pink Satin ...
$38.99

Hair Bow Holder - Personaliz...
$42.00

Once upon a time Princess Vi...
$23.00

Children's Pillow Cover ...
$18.00

Lampshade Cover for Target S...
$26.50

SALE - Huge Vintage Doily - ...
$49.00

Mixed media art - Make your ...
$32.00

Pretty In Pink Crocheted Ova...
$47.00


The first line in the treasury is a ballerina theme. There is art and a memory board for the wall and a swan lamp. I think the ballerina trinket box is adorable.

The second line is of items for an older girl. It has a mod feel to it with the turquoise and greens.

The third line is for a princess. Most little girls love the princess theme and I think these items work well with the quilt, even though you don't usually think of quilts in a princess-themed room.

The fourth line has a homespun look to it. The items are crochet and knit. I could see an older girl loving this look.

What's nice about choosing a quilt such as this is that the look can be changed as the girl grows older. While she may want a princess theme when she's young, the whole look of the room can be changed just by putting in different accessories and pillows and painting the walls.

I have another quilt in my store that I think would also work well in a girl's room. It's a bit larger so would work on a full-sized bed.
Read more ...

Sunday, February 19, 2012

Flea market ideas

I love flea markets - so many treasures to be found. In recent years, I've been able to pick up a lot of really good decorating ideas from flea market vendors. And so, I've found even another reason to love them. I want to share a couple of those ideas.

I love vintage mirrored dresser trays and they are readily available at very low prices. They come in all shapes and sizes. One vendor had three of them stacked with candle holders in between. So, I decided to borrow that idea for my guest bedroom and here is the result:


The small tray on top has small rings on the side to hold lipstick. I chose two green depression candle holders because they match my decor but just about any candle holders would work.

The other idea involves vintage Christmas lights. I've seen those vintage strands of lights with the large bulbs and have always wondered how in the world they could be used. So, I never bought any until I saw this idea at a flea market.


The vendor had used a vintage enamel container and placed the lights in it as if it were a bouquet. I have so many enamel pieces and just loved the idea. So, I bought several strands. Even though it's no longer Christmas, I think these colors look like Easter.
Read more ...

Sunday, January 8, 2012

On the cheap

OUTDOOR DECOR

I love to change my outdoor decor for every holiday. For instance, I use Valentine's decor for the month of February. For March, I decorate for St. Patrick's Day. Then of course, it's Easter.

But changing decor every month or so can get expensive, and I tend to be pretty frugal. One way I have been able to get some major impact for my front decor - besides changing my door wreath - is to change the pillows on my two chairs.

If you've ever purchased outdoor pillows, you know they can be really expensive. Even the less costly ones are more than I want to spend. Plus, I don't have the room to store pillows I'm not using.

So I came up with a cheap and easy way to change out my pillows for the different holidays. I buy two cheap placemats - usually at Big Lots. They have placemats for every occasion and usually in several different patterns. So, I have been able to find coordinating placemats for every holiday.

Most of the time, I buy fabric placemats, but I have also bought plastic placemats for the summer. The fabric ones are good if you're only going to leave them out for a month at a time. They don't have a chance to fade as they would if they were out for a longer period.

On the back of the placemat, I pull the back fabric out and cut a line down the middle. That allows me to put a pillow insert into it. Once I am finished with that holiday, I pull the inserts out and put them in another set of placemats. I don't have to have a lot of room to store the placemats I'm not using.

This is the current set I have on my chairs. I wanted something that would go from Christmas through January, and I had a woodland theme outside for Christmas.


INDOOR SCENT

I love burning candles in my house for the fragrance. Just recently, however, I discovered that I had melted a spot on my microwave by burning a candle. So, I needed to come up with other options.

I know that Scentsy products are popular and I've looked at them but didn't want to spend the money. So, when a co-worker told me about a cheap alternative, I jumped on it.

She told me to buy a cheap warmer like you use for coffee. I found one at Big Lots for $5. Then, you need a small glass jar. I found one in my refrigerator and cleaned it out. Instead of buying the more expensive Scentsy bars, she told me to go to Walmart and look for the Better Homes and Garden scented wax cubes. They're $2 for 2.5 oz (6 cubes). Then you put the cubes in the glass jar and place it on the warmer. My whole house smells delicious right now. I've got Vanilla Caramel Spice on and Blueberry Muffins waiting in the wings.

Read more ...

Wednesday, January 4, 2012

Resuming . . .

WHEW

Now that the holidays are over, I hope to resume my postings. I left most of my Christmas shopping until the week before and so I was running around like a chicken with its head cut off. And then I was out of town for several days and when I came home, it was time to do some major cleaning in the disaster zone I call my house. Because we had some really nice weather, I managed to do some work both outside and in. There's nothing like a clean house to make you feel like you're ready to face the new year with vim and vigor. I don't know how long it will last - the feeling and the clean house - but for now, I'm enjoying it all.

BUILDING ON AN ANTIQUE BASE

I'm excited to show you my newest acquisition. Awhile ago, I found an antique buffet for a very good price. It was just the right size to serve as a stand for my TV. Then, I found two stands which had the same hardware and almost matched exactly in color as the buffet. That gave me an idea and since the price of each stand was only $25, I couldn't resist buying them.

My idea was to have a cabinet built to sit on the buffet and two display cases to sit on top of the stands which would go on either side of the buffet. Fortunately, I knew of a master craftsman who could build the furniture for me. He had made custom kitchen cabinets for my sister and BIL's new house, and his work was some of the best I had ever seen.

He finished the furniture right before Christmas and I didn't have time to fill the new cases with my collections until after Christmas. Here's a picture:


 I think it turned out really well even though the craftsman lives a couple of hours away and I had to give him measurements and explain my ideas without having the furniture in front of him. He did have one of the stands but not the buffet. His concept was a little different than what I had envisioned but I love what he did.

My only concern is the lack of light this room gets. It is generally pretty dark and I am thinking about installing some lights in the top of the two cases or adding some fabric panels at the back so the collections stand out more. I'd love to hear any ideas you might have.
Read more ...